Mmmmmm. Breakfast Sandwich!

So it’s been awhile. I haven’t had a whole lot of time lately to cook or bake, at least not nearly as much as I would like. This morning, however, I decided to get up early (on a school break, even!) and make a breakfast sandwich this morning. It was lesson in making eggs, because I’d actually never made eggs that weren’t scrambled before today. Anyway, the recipe is pretty simple.

(Better Than McDonald’s) Breakfast Sandwich

Ingredients:

1 Egg

English Muffin

Pork Sausage (preferably not pre-cooked)

Cheddar Cheese

Sea Salt & Fresh Pepper for seasoning

I started with the sausage, because that took the longest to cook. Make a patty, salt & pepper each side. Lay it down for about 5-6 minutes on each side. Call it good.

When it comes to preparing the egg, I seasoned each side and did a trial and error process. I prepared one in a biscuit cutter I have (for size) and prepared one over medium. I ended up using the Over medium for the sandwich, just because it was bigger 🙂 Do what you like.

Butter the inside of your muffin and toast it–I just used the skillet–and melt the cheese on the bottom half. Stack it all up and you’ve got yourself a delicious breakfast! Image

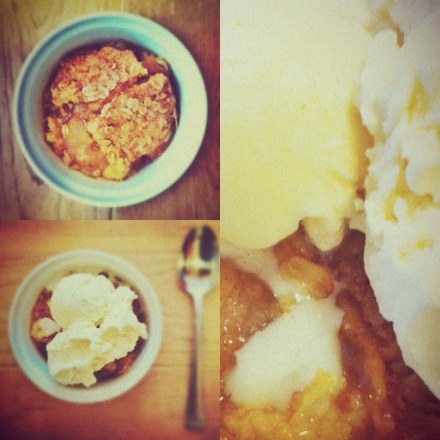
Apple Crumb Cobbler


The Autumn season is upon us, people. I couldn’t be more excited. For fashion, it’s the beginning of sweaters, scarves, hats, and the like; and in the kitchen, it’s the start of delicious recipes that feature some of my favorite flavors, one of which is APPLE.

Tonight I decided to try a pretty easy recipe that didn’t require a large amount of ingredients. The result, however, is just plain incredible. It’s basically everything you love about fall, dessert, and apples in one bowl. Delicious.

My mom used to make a variation of this back when I was in younger, but I made a few changes to make it my own. So, here we go!

Ingredients:

1 13×9 glass baking dish

2 cans of Apple Pie Filling

1 box of yellow cake mix

About 2 cups of oatmeal

1 stick of butter

3 cups of Brown Sugar

LOTS and lots of cinnamon

Nuts (if desired)

This is the easy part. (It’s all easy)

Preheat the oven to 350°.

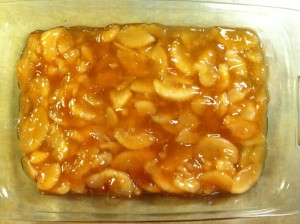
1. Combine the cans of apple pie filling in a bowl. Add cinnamon (plus nutmeg or other spices. if you so desire) and incorporate until you feel like the flavors have been distributed evenly. Transfer the apples into the dish.

2. Cover the apples with the cake mix.

3. Mix brown sugar, spices, and oatmeal (and nuts, if you’re into that sort of thing) in a small bowl, and layer it on top of the mix.

4. This part is optional. If you’re making this as a one-time indulgence, go for it. If not…go easy. But add pats of butter on top. Up to a stick. Trust me, it’s worth it.

5. Bake for about 40 minutes, and serve hot, if possible. I can’t eat this dessert without vanilla ice cream, either. It just doesn’t seem right. Top it with a scoop or two and EN.JOY.

More fall recipes coming soon. I LOVE FALL!

Quick & Easy Sugar Snaps

Sometimes, I have some extra sugar and I just want some dessert. But I don’t want to spend hours in the kitchen working on a cake, or deal with the thousands of steps involved in the cupcakes I usually want to make. So, here’s a recipe for some great sugar cookies that don’t take long to make at all.

I call them Sugar Snaps because they’re hard sugar cookies. I personally like hard and soft, but just be aware in case you’re a diehard fan of the super soft grocery store variety. These are not those. (But still delicious!)

2 3/4 cups all-purpose flour
1 teaspoon baking soda
1/2 teaspoon baking powder
1 cup butter, softened
1 1/2 cups white sugar
1 egg
1 teaspoon vanilla extract

Preparation:

Preheat the oven to 350°.

Cream together the butter and sugar until smooth (and creamy).

Combine the dry ingredients (flour, baking soda and powder) in a medium sized bowl.

Add the egg and vanilla to the butter & sugar mixture, then add the dry ingredients once the Egg-Nilla (ew) is incorporated.

Roll the dough into little balls (or giant, depending on how big your sweet tooth is) and place on an ungreased cookie sheet, baking for 8-10 minutes or until golden brown. 1 minute can be the difference between Sugar Snaps and…Black Sugar Crisps. And no one wants those. So watch them pretty closely.

These cookies will work for everything. They can stand alone (better right out of the oven with a tall glass of milk), or you can add your favorite candy to the dough, or roll them in nuts or sprinkles when they’re done. I just sprinkled a bit of Sugar in the Raw on top.

Eat them all instantly or accessorize to your heart’s content. Either way, enjoy a little sugar. (in a snap. OK, I’m done.)

Poor College Student Gourmet #1 – Chicken & Rice

Well hey there.

It’s been awhile…but I’m going to do my best to be a little more regular with the posts, I promise.

Tonight I had a friend over for dinner. We’ve been back at school for a few days before classes actually start, and as convenient as $5 pizzas are, they get a little old after awhile. So, I made chicken and rice. I’m excited to one day try something new using chicken stock, vegetables, and making more of a casserole, but for tonight I took basic chicken drumsticks coated with olive oil, Kosher salt and ground pepper, and simmered them on the stove. However, the crust this simple technique produced was delicious. Perfectly crispy, and turning the heat down a little bit towards the end seemed to keep the meat inside incredibly “off-da-bone” tender. (<;;–That’s a new catchphrase I just thought of. I like it.) Basic white rice and some mixed vegetables brought it around to a balanced meal, and we ate it about 5 seconds (granted, we are college students.) I could tell you that we had 6 drumsticks between the two of us, but that would be embarrassing so I won’t. Definitely a great meal if you don’t have a lot of time but want to stay out of Little Papa Beggar’s Pizza joint. Process/results pictures and simple recipe below.

Chicken.

(This will work with any cut you like. I’ve always been a leg man myself.)

Olive Oil.

(butter would work as well, but of course won’t be as…healthy and stuff.)

1 Tablespoon Kosher Salt/Black Pepper. (to taste)

A skillet, and a top if you don’t want your entire house or apartment smelling like a KFC.

Chicken Preparation:

Wash the chicken. You have no idea where those legs have been. Or thighs, for that matter. Pat dry with a paper towel.

Place the chicken in a hot skillet over medium heat. Let each side simmer for about 4 minutes or until slightly browned. Then cover the skillet, turn the heat down a smidge (specific, I know) and let them simmer away, keeping a close eye after about 10 minutes (on each side) so that they don’t burn. Turn them to brown the other side, and you should be golden. Brown, that is.

Rice:

For the rice, I just bring 2 cups of water to a boil, and then add a cup of rice. Keep it at a 2:1 ratio if you make more or less. Bring the water to a second boil, and then cover the pot and remove from the heat. Let it sit about 7 minutes or until its not a soppy, goopy mess anymore–and don’t open it. Just trust the steam to do it’s job. Top with a [small] pat of butter and seasoned salt.

Mixed vegetables? Get creative! Make your own.

Or, just do what I did and use frozen ones and follow the directions on the bag. 😉

just look at that crust.

(food: the only time when “crust” is a good thing.)

Mixed Berry Layer Cake

Tonight was one of those nights. I had ingredients in the cupboard and fridge, and my fingers were itching to do some baking. So I strolled Pinterest for awhile and found a recipe for this cake, and since I had leftover berries from parfaits I made last week, I decided to give it a try. It also provided the first opportunity to use my new frosting spreader I won in a cupcake competition a few months ago.

While not overly difficult, this cake ended up taking up quite a few hours of my night.

#1 lesson learned: Check your ingredients before you start. And especially before you go to the store. 

Technically a no-brainer, but my mile-a-minute mind decided this time it would be OK, I’d be fine. [I was wrong.] I knew I’d have one trip to get whipping cream, but then went back for more and again to replace the strawberries I thought were going to still be fresh. 4 hours and 3 trips to the store later, the cake is done. And from the looks of it I’d say it’s a pretty successful first go ’round.

[I don’t do box mixes. If I’m going to bake, I might as well start from the beginning and do it from scratch. Definitely a trait I picked up from my grandmother. So, instead of doing a box mix as the original recipe suggested, I adapted this recipe from about.com. It only makes two 9-inch cake rounds, So you’ll need to add an egg/teaspoon/cup here or there to fit your requirements.

Golden Yellow Cake

2 cups cake flour
2 teaspoons baking powder
1/2 teaspoon salt
1/2 cup butter, softened
1 cup sugar
3 large eggs, room temperature
2 teaspoons vanilla
3/4 cup milk

Preparation:

Preheat oven to 350°F. Grease and flour 2 9-inch cake pans.In bowl, combine flour, baking powder, and salt with a wire whisk.Cream butter and sugar until light and fluffy. Beat in eggs, one at a time. Add vanilla and mix until completely combines. Slowly add flour alternately with milk. At end of addition batter should be smooth. Divide between 2 pans.Bake Yellow Cake Recipe for 20 to 25 minutes. Cool 5 minutes in pan, then invert onto a rack and cool completely before frosting.For a 9 x 13 pan – Baked at 350 degrees F. for 30 to 38 minutes.

A few pictures from my process:

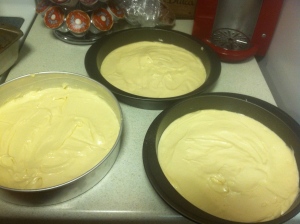
Creaming the butter and sugar

The cakes before they went in.

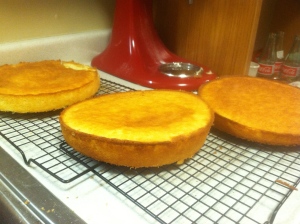
The finished [albeit lopsided] cakes

I ran into some lopsided-ness here. How do you ensure your cakes are the same width all the way throughout? [comment]
___________________________________________________
Now came the fun part: adding the frosting and berries. The recipe I followed used a basic whipped cream for the frosting, but having finished I would suggest a whipped buttercream frosting, or even a whipped cream cheese. It would have been nice to have a little more body to work with. [whipped buttercream recipe – organic optional]

My formula was thus: cake -> raspberries -> cake -> blackberries -> cake ->strawberries -> icing, with the whipped cream on every layer to seal in the berries.

I used about a quart of heavy whipping cream, so plan accordingly. 

And so it began. I thought it was going to be easy after this first layer.

I read somewhere that neatness doesn’t matter in these beginning stages, so I took that to heart.

You get the idea. Alternate cake and berries, stuffing with whipped cream, until you have a finished product. When it came to the outside, I knew I needed a thicker consistency to get the look I wanted, so I’ll be interested to see how that works out the next time I make it. Here’s the finished product.:

Top view.

Feel free to get creative with the decorations! I don’t intend to do the same thing when I make it again.

This is the perfect summer dessert to…take advantage of grocery store sales on berries? Make too much whipped cream? Show your family you love them? Whatever reasoning you give yourself, I’m sure you won’t be disappointed with this one. What I like about this the most is that you can make it as light or as decadent as you want–substitute the yellow cake for angel food, or add a layer of homemade preserves to sweeten things up. [ooh, that’s a good idea!] Go ahead, get inspired. Somebody has to!

Happy tasting,

TMWTRA